Shop › Dynamic Abutment Solutions Guided DAS Surgical Kit Universal System Accesories Image 1 of 18 Image 2 of 18 Image 3 of 18 Image 4 of 18 Image 5 of 18 Image 6 of 18 Image 7 of 18 Image 8 of 18 Image 9 of 18 Image 10 of 18 Image 11 of 18 Image 12 of 18 Image 13 of 18 Image 14 of 18 Image 15 of 18 Image 16 of 18 Image 17 of 18 Image 18 of 18 Dynamic Abutment Solutions Guided DAS Surgical Kit Universal System Accesories from $38.00 Option: Select Option Surgical Guide Kit (Box Only) Drill Anchor Pin 74.200.215.01-2 Anchor Fixation Pin 79.300.004.01-2 DAS Anchor Sleve Guide Øint. 1.53mm (5 Units) 71.340.153.01-2 DAS Guide Sleeve Øint. 4.85mm (5 Units) 71.340.485.01-2 DAS Guide Cut C Sleeve Øint. 4.85mm (5 Units) 71.340.485.02-2 DAS Sleeve gripper 79.300.003.02-2 Extensor Rachet S 79.600.009.01-2 Extensor Rachet L 79.600.010.01-2 Extensor Contrangle S 79.600.007.01-2 Extensor Contrangle L 79.600.008.01-2 Mount Extractor M2.5 L32,00mm Hex.1.20 79.300.001.02-2 Universal Square Torque Wrench 10-35N·cm 11.990.990.07-2 Screwdriver Hex 1.20 43.601.103.02-2 Tissue Punch Drill 74.120.230.01-2 Bone Flatening Drill 74.150.225.01-2 Initial Pilot Drill 9 mm 74.030.220.01-2 Initial Pilot drill 10.5 mm 74.030.220.02-2 Initial Pilot drill 12 mm 74.030.220.03-2 Initial Pilot drill 13.5 mm 74.030.220.04-2 Guided Drill Ø 2 L 6 74.060.220.01-2 Guided Drill Ø 2 L 8.5 74.085.220.01-2 Guided Drill Ø 2 L 10 74.100.220.01-2 Guided Drill Ø 2 L 11.5 74.115.220.01-2 Guided Drill Ø 2 L 13 74.130.220.01-2 Guided Drill Ø 2 L 16 74.160.220.01-2 Guided Drill Ø 2 L 19 74.190.220.01-2 Guided Drill Ø 2,5 L 6 74.060.225.01-2 Guided Drill Ø 2,5 L 8.5 74.085.225.01-2 Guided Drill Ø 2,5 L 10 74.100.225.01-2 Guided Drill Ø 2,5 L 11.5 74.115.225.01-2 Guided Drill Ø 2,5 L 13 74.130.225.01-2 Guided Drill Ø 2,5 L 16 74.160.225.01-2 Guided Drill Ø 2,5 L 19 74.190.225.01-2 Guided Drill Ø 2,8 L 6 74.060.228.01-2 Guided Drill Ø 2,8 L 8.5 74.085.228.01-2 Guided Drill Ø 2,8 L 10 74.100.228.01-2 Guided Drill Ø 2,8 L 11.5 74.115.228.01-2 Guided Drill Ø 2,8 L 13 74.130.228.01-2 Guided Drill Ø 2,8 L 16 74.160.228.01-2 Guided Drill Ø 2,8 L 19 74.190.228.01-2 Guided Drill Ø3 L 6 74.060.230.01-2 Guided Drill Ø 3 L 8.5 74.085.230.01-2 Guided Drill Ø 3 L 10 74.100.230.01-2 Guided Drill Ø 3 L 11.5 74.115.230.01-2 Guided Drill Ø 3 L 13 74.130.230.01-2 Guided Drill Ø 3 L 16 74.160.230.01-2 Guided Drill Ø 3 L 19 74.190.230.01-2 Guided Drill Ø3.3 L 6 74.060.233.01-2 Guided Drill Ø 3.3 L 8.5 74.085.233.01-2 Guided Drill Ø 3.3 L 10 74.100.233.01-2 Guided Drill Ø 3.3 L 11.5 74.115.233.01-2 Guided Drill Ø 3.3 L 13 74.130.233.01-2 Guided Drill Ø 3.3 L 16 74.160.233.01-2 Guided Drill Ø 3.3 L 19 74.190.233.01-2 Guided Drill Ø3.6 L 6 74.060.236.01-2 Guided Drill Ø 3.6 L 8.5 74.085.236.01-2 Guided Drill Ø 3.6 L 10 74.100.236.01-2 Guided Drill Ø 3.6 L 11.5 74.115.236.01-2 Guided Drill Ø 3.6 L 13 74.130.236.01-2 Guided Drill Ø 3.6 L 16 74.160.236.01-2 Guided Drill Ø 3.6 L 19 74.190.236.01-2 Guided Drill Ø3.9 L 6 74.060.239.01-2 Guided Drill Ø 3.9 L 8.5 74.085.239.01-2 Guided Drill Ø 3.9 L 10 74.100.239.01-2 Guided Drill Ø 3.9 L 11.5 74.115.239.01-2 Guided Drill Ø 3.9 L 13 74.130.239.01-2 Guided Drill Ø 3.9 L 16 74.160.239.01-2 Guided Drill Ø 3.9 L 19 74.190.239.01-2 Guided Drill Ø4.2 L 6 74.060.242.01-2 Guided Drill Ø4.2 L 8.5 74.085.242.01-2 Guided Drill Ø4.2 L 10 74.100.242.01-2 Guided Drill Ø4.2 L 11.5 74.115.242.01-2 Guided Drill Ø4.2 L 13 74.130.242.01-2 Guided Drill Ø4.2 L 16 74.160.242.01-2 Guided Drill Ø4.2 L 19 74.190.242.01-2 Guided Drill Ø4.5 L 6 74.060.245.01-2 Guided Drill Ø4.5 L 8.5 74.085.245.01-2 Guided Drill Ø4.5 L 10 74.100.245.01-2 Guided Drill Ø4.5 L 11.5 74.115.245.01-2 Guided Drill Ø4.5 L 13 74.130.245.01-2 Guided Drill Ø4.5 L 16 74.160.245.01-2 Guided Drill Ø4.2 L 19 74.190.245.01-2 Zimmer Screw-Vent 3,5 Implant Mount Offset 9mm. Comp.0041-B1 / 75.117.041.48-2 Zimmer Screw-Vent 3,5 Implant Mount Offset 9.5mm. Comp.0040-B1 / 75.118.040.48-2 Zimmer Screw-Vent 3,5 Implant Mount Offset 10.5mm. Comp.0040-B1 / 75.120.040.48-2 Zimmer Screw-Vent 3,5 Implant Mount Offset 12mm. Comp.0040-B1 / 75.123.040.48-2 Zimmer Screw-Vent 3,5 Implant Mount Offset 12.5mm. Comp.0040-B1 / 75.124.040.48-2 Zimmer Screw-Vent 3,5 Implant Mount Offset 13.5mm. Comp.0040-B1 / 75.126.040.48-2 Zimmer Screw-Vent 4,5 Implant Mount Offset 9mm. Comp.0041-B1 / 75.117.041.48-2 Zimmer Screw-Vent 4,5 Implant Mount Offset 9.5mm. Comp.0041-B1 / 75.118.041.48-2 Zimmer Screw-Vent 4,5 Implant Mount Offset 10.5mm. Comp.0041-B1 / 75.120.041.48-2 Zimmer Screw-Vent 4,5 Implant Mount Offset 12mm. Comp.0041-B1 / 75.123.041.48-2 Zimmer Screw-Vent 4,5 Implant Mount Offset 12.5mm. Comp.0041-B1 / 75.124.041.48-2 Zimmer Screw-Vent 4,5 Implant Mount Offset 13.5mm. Comp.0041-B1 / 75.126.041.48-2 Straumann Bone Level Narrow Implant Mount Offset 9mm. Comp.0033-B1 / 75.117.033.48-2 Straumann Bone Level Narrow Implant Mount Offset 9.5mm. Comp.0033-B1 / 75.118.033.48-2 Straumann Bone Level Narrow Implant Mount Offset 10mm. Comp.0033-B1 / 75.119.033.48-2 Straumann Bone Level Narrow Implant Mount Offset 11mm. Comp.0033-B1 / 75.121.033.48-2 Straumann Bone Level Narrow Implant Mount Offset 12mm. Comp.0033-B1 / 75.123.033.48-2 Straumann Bone Level Narrow Implant Mount Offset 12.5mm. Comp.0033-B1 / 75.124.033.48-2 Straumann Bone Level Narrow Implant Mount Offset 13mm. Comp.0033-B1 / 75.125.033.48-2 Straumann Bone Level Reg. Implant Mount Offset 9mm. Comp.0035-B1 / 75.117.035.48-2 Straumann Bone Level Reg. Implant Mount Offset 9.5mm. Comp.0035-B1 / 75.118.035.48-2 Straumann Bone Level Reg. Implant Mount Offset 10mm. Comp.0035-B1 / 75.119.035.48-2 Straumann Bone Level Reg. Implant Mount Offset 11mm. Comp.0035-B1 / 75.121.035.48-2 Straumann Bone Level Reg. Implant Mount Offset 12mm. Comp.0035-B1 / 75.123.035.48-2 Straumann Bone Level Reg. Implant Mount Offset 12.5mm. Comp.0035-B1 / 75.124.035.48-2 Straumann Bone Level Reg. Implant Mount Offset 13mm. Comp.0035-B1 / 75.125.035.48-2 Nobel Biocare Conical Connection N Implant Mount Offset 9mm. Comp.0021-B1 / 75.117.021.48-2 Nobel Biocare Conical Connection N Implant Mount Offset 10mm. Comp.0021-B1 / 75.119.021.48-2 Nobel Biocare Conical Connection N Implant Mount Offset 10.5mm. Comp.0021-B1 / 75.120.021.48-2 Nobel Biocare Conical Connection N Implant Mount Offset 12mm. Comp.0021-B1 / 75.123.021.48-2 Nobel Biocare Conical Connection N Implant Mount Offset 13.5mm. Comp.0021-B1 / 75.126.021.48-2 Nobel Biocare Conical Connection R Implant Mount Offset 9mm. Comp.0022-B1 / 75.117.022.48-2 Nobel Biocare Conical Connection R Implant Mount Offset 9.5mm. Comp.0022-B1 / 75.118.022.48-2 Nobel Biocare Conical Connection R Implant Mount Offset 10mm. Comp.0022-B1 / 75.119.022.48-2 Nobel Biocare Conical Connection R Implant Mount Offset 10.5mm. Comp.0022-B1 / 75.120.022.48-2 Nobel Biocare Conical Connection R Implant Mount Offset 12mm. Comp.0022-B1 / 75.123.022.48-2 Nobel Biocare Conical Connection R Implant Mount Offset 12.5mm. Comp.0022-B1 / 75.124.022.48-2 Nobel Biocare Conical Connection R Implant Mount Offset 13.5mm. Comp.0022-B1 / 75.126.022.48-2 Quantity: Add To Cart Added!

 Image 1 of 18
 Image 2 of 18
 Image 3 of 18
 Image 4 of 18
 Image 5 of 18
 Image 6 of 18
 Image 7 of 18
 Image 8 of 18
 Image 9 of 18
 Image 10 of 18
 Image 11 of 18
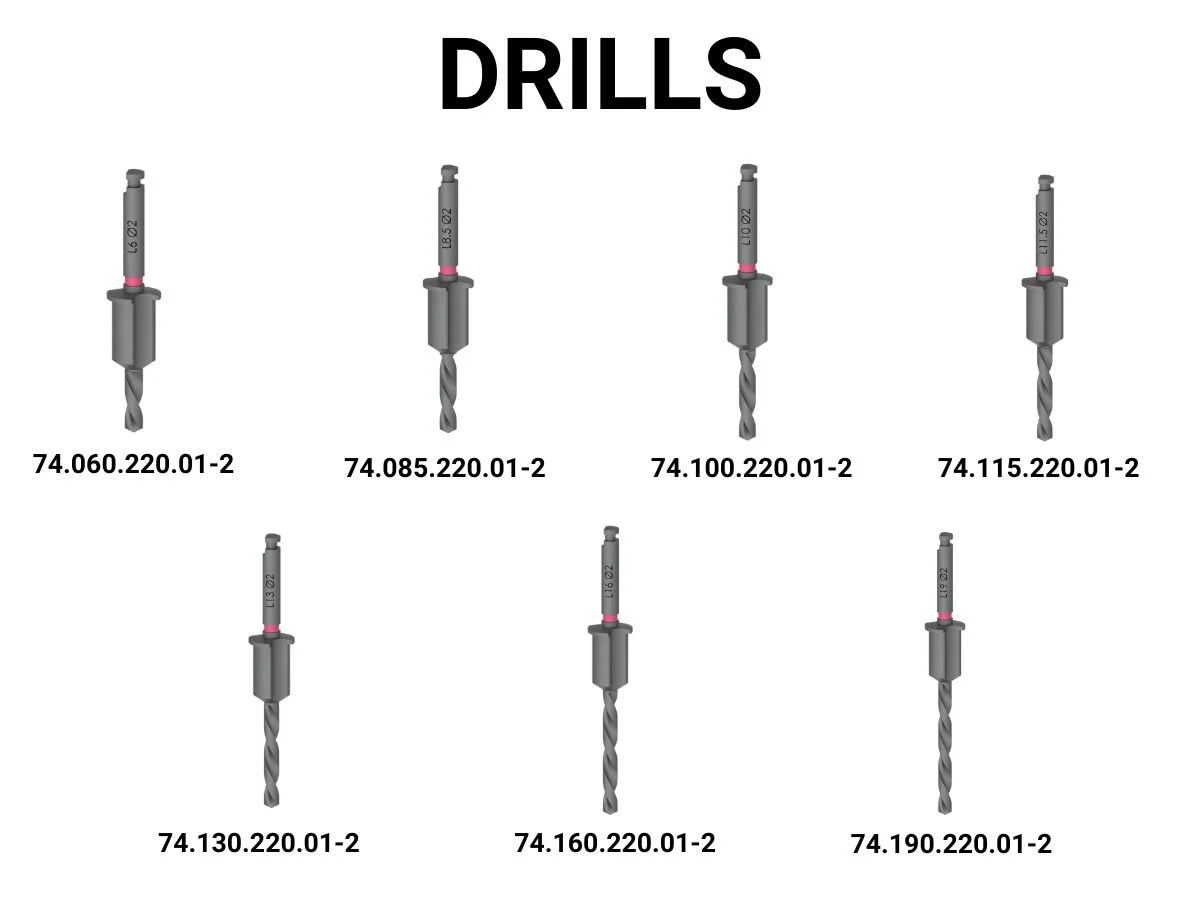 Image 12 of 18
 Image 13 of 18
 Image 14 of 18
 Image 15 of 18
 Image 16 of 18
 Image 17 of 18
 Image 18 of 18